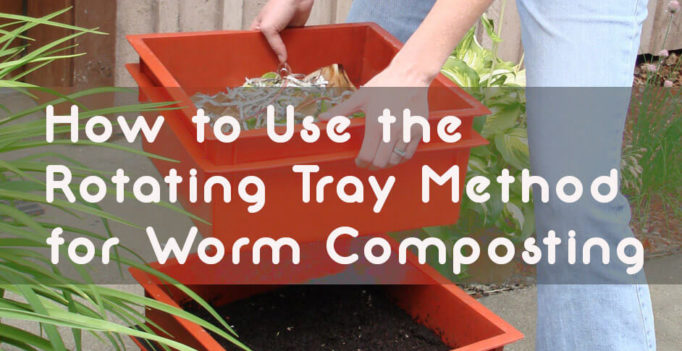
When it comes to worm composting, the rotating tray method is one with clear logic behind it. Simple enough for nearly anyone to use, thousands of families like ours successfully use systems like these to upcycle their kitchen waste year after year.
Their popularity comes as no surprise. Even moderately priced units come equipped with built-in solutions. They keep away pests, allow for drainage, encourage airflow, and can be used to cure and harvest the worm compost.
That’s not all. Their stackable, perforated layers create a sizeable worm composting set-up in a really small space. For example, in only 18” square, our Worm Factory 360 holds as many as 10,000 worms, and holds up to 6 trays at a time!
That’s really exciting. But numbers like that only happen once you’ve got a whole tower of trays going strong and steady.
So, how do you go from stage one, the first bottom tray, to a fully-rockin’, rotating stack of worms at work?
If you’re curious, you’re not the only one. Lots of readers email us asking how to use the rotating tray method for worm composting. Luckily, It’s pretty simple.
Come on, I’ll walk you right through it.
When is it time to start a new layer?
First things first, right? You don’t want to jump the gun on this one, and I’ll tell you why.
When you establish your very first tray, with a brand new colony, encouraging reproduction is your top priority. The more you can keep worms near each other, the more likely they are to get together and populate that space.
But when it’s time, it’s time. Here are some indicators:
- Population reaches max density.
- Bedding and compost reach the top of the tray.
- You want to quickly expand an already established colony to process more waste.
How do you start the next layer?
Second, and all following layers, are even easier to start than the first.
Remember how you set up your first tray? No? Need a reminder?
Okay, we’ll start here: The second layer starts like the first but without a layer of newspaper to separate the levels.
Then, it’s really all about the bedding. I make bedding like I’m cooking a recipe. Here’s one way I do it, and you can too:
- I start with a huge stainless steel bowl and add soaked, drained, and fluffed shredded paper. (I’ve used coconut coir, leaves, bark, etc.)
- Into that I add torn up egg cartons, to help with airflow and moisture maintenance.
- Then, in go crushed eggshells for grit and minerals, spent coffee grounds (because I have tons), and a generous scoop of the good stuff (finished compost) from tray #1- worms and all.
- I set my ready-and-waiting empty tray atop the original, still allowing for airflow and movement of the worms.
- Into the tray the bedding mixture goes. I like to start with about 2 inches of this “starter” across the bottom, but even a little pile will do.
- To encourage my worms to start their migration, I place feedings only in the newly created tray.
- Then, since new layers are usually sparse and rather exposed, I like to blanket the top with moist cardboard or newspaper. This ensures the humidity stays high and that more worms stay close. Move the first tray’s newspaper ceiling to the second tray on top of the bedding. This will “open the door” to worm travel between layers.
What about rotation?
Rotating your trays happens after you’ve got a full stack piled up. The purpose is to allow each tray to be harvested on a regular basis, maintaining a more healthy environment than one in which compost sits too many months.
The rate at which you rotate will depend on feedings and conditions in your own worm bin. Generally, a mature colony will finish a tray in 3 months or so. And when this happens, that bottom tray needs to find its way out and to the top.
Everybody, ROTATE!
To rotate my trays, I lay my lid upside down on the floor and unstack my tower one tray at a time beside me. Once I reach my treasured bin of finished compost, I set it aside, and rebuild my tower of worms.
Kept in the same order as before, now tray #2 is on the bottom. Without any lid, the #1 tray gets put on the top of the stack. It will stay there exposed just long enough to dry out and get the worms to move down into #4.
Once that bin is cleared out (harvested), where does it go?
Right back on top, with a lid, to await a fresh start.
Rotation complete.
Which layers get feedings?
Compost worms are simple creatures. They go wherever the food is. So if you want some worms to go live in a new neighborhood (tray #2, 3, 4), put the food there. If you want some to move, but some to stay and finish the work they started down below, go ahead and put food in both places.
As soon as you think a tray is getting close to completion, stop putting food into it. This will help it to start to dry out a bit and encourage worms to evacuate.
How to Get your Worms to Move Out
Most worms don’t mind exploring, especially when something tasty is nearby. But others seem to prefer staying put, in dark, wet, worm-filled places. That sometimes means, getting your worms to scoot takes some extra assistance.
There are a few ways to get this job done:
- By hand
- By lure
- By exposure
To remove your worms by hand is very time consuming and frustrating. It does, however, allow you to get up close and personal with your crew. If you choose this route, be sure to block out a good chunk of time and expect to make a mess. There will be clean up.
Using a lure is more of a hands-off approach. Your best bet? Some kind of melon or squash that’s starting to go bad. Simply irresistible! Whether placed in the tray above or below, the worms will head that way. Withholding a feeding or more before the planned move will draw more worms more quickly.
The last is my favorite, evacuation by exposure. Knowing that worms instinctively slink into the dark when light appears, we can easily get them to move DOWN by applying light from above. Generally, this happens in the open…which then begins to dry out the bedding, forcing worms to seek wetter conditions DOWN BELOW.
So, as a tray comes out of the rotation, it is placed without a lid at the top of the stack. Light and air from above start the migration process. Periodic hand-raking of the top layers loosens what can be either harvested or left to dry further. As top layers are removed, the worms work their way down through the bedding, and eventually into the tray below.
How long does it take worms to move into a newly added tray?
I remember the first time I tried to harvest a tray and needed my worms to move out. I thought it would take a few hours for them to find the food hidden just beyond their tray. Man, was I way off!
I didn’t realize what I was expecting. My worms were livin’ large in gorgeously fine compost. It had just the right moisture content, pH, temperature, and lots of like-minded individuals there too. How was a mere piece of fruit to contend with that?
Needless to say, when I came back a few hours later, I discovered a weak turn-out at cantaloupe corner. I was shocked.
These days, I allow a full tray of finished compost about a week to clear out. I feel as if this “slow” process is a fairly natural way of moving them out while having the added benefit of curing the compost at the same time.
But to answer the question more directly, I can only say that it all depends on the existing conditions and what’s on the other side. Then, on their own, a vast majority may move through as quickly as overnight, while others may linger for weeks.
Do you have any more questions about the tray method of worm composting? Please let us know in the comments section below.
Take your mindful living to another level! Grow your worm herd and your environmental impact. Put kitchen waste behind you with your own rotating-tray worm composting system. Try the Worm Factory 360 for flexibility, ease of use, and ultimate worm composting productivity.
Yes! Finally instructions that suggests worms more readily migrate downward rather than upward. I believe many have been misled and have felt they failed when told the bottom tray will be ready for harvest thus giving up or searching for another method. And why not let the previous bottom tray sit on top awhile. GOOD INSTRUCTIONS
Hi Pat! Thanks for your insight on the feelings of frustration and doubt that come when your trays don’t seem to finish as they “should.” It’s okay for all of us to do a little bit of the trial and error method with our worms. Anything that works- works! And as for downward migration, I think worms (in the dark) are as happy to move up as they are down as long as there is food to be had wherever they’re heading. In the presence of light- yes, they head down (like to a bottom tray) but if there is no food there- they’ll soon leave.
I agree and I’m so confused now. I only have 2 trays and the bottomed one above the liquid tray is so full of moist black soil and worms I think I’m squashing them. The one above it is the top one and is half full with the food and scraps and choir and soil. I don’t know what to do. 😥😥
Hi Debbie,
The main reason we recommend new trays are added to the top instead of the bottom is that, it will be a lot easier to add food scraps and bedding material to the active tray when it is on top. If you keep the active tray on the bottom of the Worm Factory, you’ll have to remove all of the other trays to add any material.
You mentioned that your bottom tray is full of moist black soil. You’ll know that your vermicompost is ready for harvest when the material is dark and has an earthy odor. You won’t really be able to identify any specific items in the vermicompost, and it will resemble rich soil. If it has been at least 45-60 days from when you started on the bottom tray, it is possible that your vermicompost is now ready for harvest.
Learn more about harvesting your vermicomposting here:
https://thesquirmfirm.com/when-is-it-time-to-harvest-and-use-worm-compost/
https://thesquirmfirm.com/how-harvest-worm-compost-black-gold-easily/
Thank you Fae. Like Debbie, I have been very confused about movement of trays. There is always plenty of advice on setting up and feeding but not rotating trays. I would love clearer instructions on the rotation system. Many thanks. Sue
My major difficulty with my Worm Factory 360 is underneath the bottom tray. No matter what I try, a large number of worms seem to think that bottom are is the place to be. Any suggestions other than manually moving them to the top tray?
Hi John. So my best guess is just simply that whatever you’ve got going on in the bottom tray is just really sweet in contrast to the upper trays. How so? Temperature, moisture, food, Ph, etc. In a tray system usually the most moist conditions are near the bottom. Upper levels dry out more quickly. What happens if you rotate the trays? Do they all still head south? If you really need them to move up, just don’t put any food into lower trays and put something like melon near the top in some nice cozy, moist bedding. Best of luck!
I have an older model Worm Factory but I can’t get much migration up. They all want to go down.
Hi Michele, give your trays a rotation and you may find that your worms just want to be wherever the most food, moisture, and comfortable bedding is at. Sometimes, to get worms where I want them, I just add feedings to one tray alone. In a fully operational stack of trays it may take some time to encourage slow pokes to leave other trays, but if only one is perfectly moist and stocked with food, it should help. On the flip side of the same coin, if you want worms to leave a tray, leave it exposed on the very top of the stack. They should head down away from the light but still be fairly near the top rather than bottom of the tower. Enjoy!
How do you dry out the tray when it’s time to harvest?
Move the tray to the top without a lid until it is the consistency you want.I usually let mine sit a couple of weeks. If I need the tray I dump the vermicompost in a tray to dry further. Egg cartons or unshredded cardboard can be used to draw moisture and then pulled out
Hi John, there are many ways to dry out a tray for harvest. My personal favorite is just to move that tray to the top of the stack and leave it open. Gently rake the top layer of it every few hours or so and it will both dry the compost and evacuate the worms within a couple days or so. It’s a bit of a slow process, but that won’t allow it to turn bone dry, essentially destroying the beneficial microbes that are so precious in the compost.
I bought my farm a year ago and was told that the population would double in a year.Wrong,I have added another stack and that one is squirming with worms too. Millions! I tried rotation up and down , but for me it works best: sit outside with a large table,dump the full tray on it and pile it up. After a while they have fled to the bottom, and I can scrape the compost towards me into a bucket on the ground. Tedious, but I get the eggs too, and a good idea how many more buddys I have. Unfortunately in South Africa it’s not very popular yet,and you can’t GIVEAWAY to like minded people.
When you rotate trays and leave the lid off the top tray to dry out, what do you do with the worms that are escapees who don’t mind the light and don’t seem to want to go down to the other trays?
Thanks for your question, msbjackson. I’m imagining escapee worms and wonder if you are working with red wigglers or something different. Red wigglers are particularly sensitive to light and won’t typically let themselves be exposed. However, there are other types of worms that don’t compost as well that are also more comfortable in the light- they are called perionyx excavatus, as opposed to the Eisenia fetida species we use. Maybe you have some of them?! They have a more excitable personality and have a tendency to “explore.” So, how do you deal with them? I once had an escapee situation with these impostor worms and I ended up on my hands and knees rescuing for quite a while. I’d suggest trying a more tempting treat to lure them into the trays below. Otherwise, yep, it’s just going to be hand picking and replacing. Let us know if you figure out something else that works well!
How do you know if your population is at maximum density?
Hi Rick! If only our worms could just tell us when they needed more space. Population density will vary based on the maturity of your composting system, the herd, and conditions throughout. This is really something the worms manage on their own. They know when conditions are right for reproduction and survival of the young. It has been said that approximately 1000 worms can comfortably cohabitate within every square foot of surface area (2 inches deep). If you don’t see any more cocoons being laid and your worms are looking densely populated- you can easily start a second Worm Factory tray or bin, and watch the reproduction ramp up once again.
Hi Rick! If only our worms could just tell us when they needed more space. Population density will vary based on the maturity of your composting system, the herd, and conditions throughout. This is really something the worms manage on their own. They know when conditions are right for the reproduction and survival of the young. It has been said that approximately 1000 worms can comfortably cohabitate within every square foot of surface area (2 inches deep). If you don’t see any more cocoons being laid and your worms are looking densely populated- you can easily start a second Worm Factory tray or bin, and watch the reproduction ramp up once again.
EXCELLENT. YOU SHOULD DO A VIDEO
Thanks! Great idea!
This is great information. I have been considering using this system for a while. But like the worms I move slowly. Cheers
I am raising African night crawler they are migrating kind of big worms for bait. I got lots of mortality at first because they go the most bottom and drown in water. So I placed black garden cloth so they won’t escape–what works with me is…my most bottom is the newest tray, when it is already damped I transfer the whole contents to the second top. I always feed at the second bottom and harvest always at the top most (without cover) I have already six trays.
Thanks Rodolfo for sharing your experience and method for raising night crawlers using the tray method. Isn’t it so versatile? The versatility of the tray tower method is something I really appreciate. We can all be successful using it however suits us best.
Get read I always evacuated the worms by ha d but will do your exposed method from now on. Thanks
Thanks Brenda. Bright light is a signal that most worms will hide from. Natural light is best, but artificial light is a great substitute at night.
What about the eggs? The worms aren’t going to take them with are they?
Hi Therese, good question. The worms will leave the egg sacks behind. They will hatch when conditions are right and are self sufficient from the start.
I bought my farm a year ago and was told that the population would double in a year.Wrong,I have added another stack and that one is squirming with worms too. Millions! I tried rotation up and down , but for me it works best: sit outside with a large table,dump the full tray on it and pile it up. After a while they have fled to the bottom, and I can scrape the compost towards me into a bucket on the ground. Tedious, but I get the eggs too, and a good idea how many more buddys I have. Unfortunately in South Africa it’s not very popular yet,and you can’t GIVEAWAY to like minded people.
Hi Christa. So glad to hear of you being a front runner in the worm composting craze that is soon sweeping South Africa! By the way, a new worm colony is more likely to double within the first three months. Within a year,…yep, millions. (Well, maybe thousands- for you who like to keep me honest (: )
Hi Christa. So glad to hear of you being a front runner in the worm composting craze that is soon sweeping South Africa! By the way, a new worm colony is more likely to double within the first three months. Within a year,…yep, millions. (Well, maybe thousands- for you who like to keep me honest (: ) Check this article out for more: FIRED UP: 4 WAYS TO IGNITE A RED WIGGLER BREEDING FRENZY.
I have 2 compost bins going. I use the worm one and then I have a hot bucket compost. The temp reaches 120+ and it only gets leaves yard clippings. Can I use that to help start the second tray?
Hi Levi. Good thinking. If you allow the leaves to start by hot compost and finish with the worms you will have done a very good thing. Please just let the hot compost cool before adding to the worm bin! But just to be clear- you can add compost to the worm bin- not worms to the compost- that would be too hot for them to survive. By the way- you can fill the entire stack of trays with those leaves if you want to. Your worms will soon fill the space and start breaking it all down. It’s faster than hot compost and gives the worms lots of places to explore.
i just started my farm about 2 weeks ago. i have spouts that have started growing. is that normal? also lots of gnats/flies and it seems like the food is getting eaten that fast? Also my worms arrived about 4 days before my equipment did, so i put in wet soil. when i added the worms to my composter i also put quite a bit of that soil in. do you think that could be causing a problem?
Hi Brad. Congratulations on your new worm composting adventure! Sprouts? If you have any seeds that go into that nice warm, moist bin- Yep, they’re going to be so happy and will quickly suck up the moisture and surprise you with long sprouts. No problem at all. Very soon they die and just decompose along with everything else in there. Lots of gnats may mean your bedding is too wet, or that the food is too exposed. Try burying the food and laying moist newspaper over the top to keep pests from being able to get to it. It is very likely that there were little gnat or fly eggs in the soil you added. They won’t harm the worms or eat much of their food, but they are annoying. The newspaper is a great first attempt solution! Hope it works right away!
I have had a worm farm 360 for three weeks and had a nasty fruit fly problem; I added compost from outdoors and brought eggs in. I placed my worm farm outside under the porch light at night with the worm farm cover and newspaper below it removed. After about 20 minutes I put the paper back on and then the lid and brought the farm in through an unlit entrance. Flies were left buzzing the porch light and now no bugs since about day 5. I hope someone finds this useful.
Thank you so much for that information! That is indeed helpful and we will surely share that with other worm composting enthusiasts!
Hi,
Hi Francesca, thank you for your really informative page and instructions.
I have been using Red worms for composting for about a year now, using Polystyrene boxes from the supermarket than would have otherwise gone into landfill.
I have just purchased a 2nd hand ‘Can-O-Worms’ which has 3 trays, to give it a try. Using the rotation method, subsequent bottom trays will not have a base layer of paper/cardboard to prevent the worms exiting to the basement liquid reservoir. Just wondering if you or anyone else had found this to be a problem?
Also, I just setup the first (bottom) tray yesterday, using about 20 mature worms, 200 baby red worms, that had hatched from castings which were harvested about 2 weeks ago and all of the cocoons I could find. I added about 100 more mature worms from 3 of my older worm trays (a small handful from each) to add some cultural diversity. Do you think this is enough to get it started? (about 120 mature and 200 juvenile + cocoons)
Kind regards,
Chris
Fleurieu Peninsula
South Australia
Hi Chris! You are right on track with your set up and the number of worms you’ve added. Many people start with more, but you are honestly fine with what you have because they reproduce SO quickly. Within 3 months your whole tower may be full of worms! So, as for setting up trays and not laying down newspaper, that’s not a huge deal. The worms shouldn’t just fall through. They’re really good at climbing up and down through the layers. You’ll find some will venture into the catch basin, and they may even hang out there a while. When they want to, they move back up to where you’ve got food and friends for them. But then again, you COULD always add a layer of newspaper if you wanted to. I’ve added newspaper at times when I’ve somewhat wanted to keep a herd together, or maintain moisture, or prevent stuff from falling through. Worm composting is really flexible and easy to do well even with different approaches. Keep it up!
If I am using Rubbermaid totes, how do you suggest stacking them without squishing the worms below. I was thinking dowels horizontal, but how deep should each bin be? Nesting them together without support doesn’t give much space. Suggestions?
Hi Krista. I love to hear that you are building up your worm herd and compost production! I think it’s important to know why you are doing it that way to answer your question. There was a time at which I had 15 worm bins going. Most of them were totes like I think you are using. Mine were full sized storage bins. I just stacked them like the rest of my bins. Lid on, one over the other. Some had air holes and others I just opened frequently enough for oxygen exchange. Your question about depth kinda is the key. After a while you end up with too much compost for easy lifting. Also, after some time that compost needs to be rinsed or harvested to deal with the salt build up. Another option is to use under bed storage totes which can be filled almost all the way up and don’t waste much space at all.
Hi there, I have a Tumbleweed 3-tray system with food going in the top tray. The middle tray has coconut coir bedding but I’m not sure if it is ready to be harvested. The middle layer has castings but there is still coconut coir mixed in. The top layer has about a third of castings. Should I harvest the top layer or rotate with the middle and add bedding to the original top layer?
Ok so You start the worms in the first tray: Then you add the second tray. How do the worms get through the bottom of the second tray? Does it have holes? Then you move the bottom tray to the top? If it has holes The juice would leak out & the worms would escape? Would you explain how the worms move from tray to tray? I understand you entice them with food. But how are the trays made? Bob
The trays are designed with holes that will allow the worms to go to the next tray. The holes are also for the leachate to be drained off the trays. The leachate then goes to the base and goes out of the bin through the spigot. The leachate needs to drained, otherwise, you will have a smelly bin.
The worms will only feel the need to get out of the worm bin if the condition is not favorable for them. That is why it is important to monitor the moisture, acidity, and temperature in your worm bin to ensure that the worms will not want to escape.
You are my worm God! Thank you. Finally, someone who has relayed ALL the information I needed in a simple but accurate manner without making me feel like school was a waste of time. I have an illness where things don’t always make sense but you Sir, you worded it perfectly. In country Australia we use 44 gallon drums cut in half but I’ve had to move to Canberra and, as it helps my vegie patch, I bought a Maze farm & this tray business is foreign to me. I hope to learn more from you. Have fun worming. H.
Thank you so much for your kind words! Please feel free to reach out if you have any questions.
Good day Francesca. Excellent instructions.
I am about 4 months into my first tray and about to add the second. The worms haven’t been fed in 2 weeks. There is still shredded cardboard in my bedding.
The question I have. I don’t like to run a wet bin. I found that adding water regularly made the bin mud like and got a lot of mites and springtails. I have since stopped adding water but during the starvation period, I am adding small amounts. I don’t collect leachate any longer, nor is it produced in quantities (don’t need to drain – but the springtails LOVE the reservoir tray where minimal leachate does remain).
my bedding/castings when squeezed is like a wet sponge.
Whould I continue giving the worms grit even though they are not being fed?
I am ow at four levels in my tower. As I went to relocate the bottom tray to air out on top, I noticed what appears to be THOUSANDS of babies. The tray is pretty damp, so maybe that is the reason? Is it common to have them use one tray as a nursery??? I’ve only been going at this endeavor for about 3 months now.