Most of my life I hardly noticed the worms outside, much less rewarded them for the work they did. But now, I appreciate them far more- I recognize their elevated status and treat them accordingly because of it! Our worms are extra special treasures that serve a much higher purpose. It’s their great value that has earned them a place inside my house. And with winter fast approaching, I want to share why you might consider bringing your worms indoors too.
To simplify the transition from outdoor worm composting to indoor, I’ll also share tips on how to set up the ideal indoor spot and maintain its productivity year round. It’s easy. And all you need to start is just to bring in that worm bin!
Why Not Leave them Outside?
Oh, I get it. Nobody likes being told what to do. So I’ll let you decide for yourself. First, let me explain how Eisenia fetida reacts when winter weather sets in.
Native to areas more tropical than here in the states, red wigglers aren’t well-suited for year-round exposure. That means, unlike the earthworms, many of us are familiar with, compost worms don’t bury themselves deep below the frost line to wait out the winter. These guys are surface dwellers through and through.
As ambient temperatures begin to dip below the ideal 55-75F range, red wigglers
- Move more slowly through their bedding
- Consume less food
- Produce less composted material
- Reproduction rates plummet
- Life stops when temps stay 40 or below
Lessons Learned the Hard Way
I believe I found this out the hard way when I first started my worm composting hobby. I pushed it too far thinking my tub of compost was deep enough to handle the cold. It wasn’t. So I was left with a bin of fairly wet, unfinished compost, full of dead worms.
If this has happened to you, fret not. All is not lost. This rescue mission post will help you through it. But trust me, if you still can, don’t let your worm herd die off from the cold! Keep your worms warm and working throughout the chilly months of winter by bringing them inside.
Still not sure about that? One more thing to consider, how likely are you to suit up and brave the elements to care for an outdoor worm farm this winter? Forget the rain and sleet, ice and wind! I, for one, plan on staying nice and cozy while tending to my composting creatures.
Easiest Pets Ever
Luckily, when it comes to live-animal care, compost worms require the least of all. It’s really no wonder that so many parents and teachers get their first pound of worms as pets for their young animal lovers to enjoy.
Red wiggler compost worms never need to be taken for a walk or out to pee, given a bath or shots. They are entirely silent and don’t even require light. They aren’t picky and make fast work of free kitchen scraps and yard waste, paper, cardboard, and even manure from pets and livestock.
This is a hobby almost anyone could enjoy – right in the comfort of their own home – summer, winter, spring, or fall.
Home is Where the Worm Bin Is
By the time my second worm composting winter rolled around, I had already learned one lesson the hard way. I’d lost my first herd to an early freeze the year before. I wasn’t giving up, but I really wasn’t sure what to do.
I had read up on outdoor winter worm composting but wasn’t down for all that. It takes a good bit of effort to bury a worm bin, insulate, or add a heating element! So, I brought my worms inside to buy time while I figured out a solution.
What started out as a shortcut to avoid the weather became a method I’ve come to appreciate for many reasons.
No matter what the weather outside, a well-situated indoor compost bin remains consistently moist, warm, and very active on the inside. But aside from the obvious advantage of not freezing solid, allowing your worm bin to stay inside is beneficial for other reasons too:
- Proximity to the food source – you won’t have to trek through the snow, ice, or mud to keep your worms fed.
- Continued population growth – cocoons and worms keep right on growing without ever slowing down.
- Protection from outside critters who may try to invade.
- Access to compost for indoor plants throughout the winter.
What NOT to Worry About
As I dragged my worm bin over the threshold and across the kitchen floor, a wary gaze tracked my every step. It was the Mr. He wasn’t so sure about our having worms in the house.
He complained, “We’re going to have worms crawling around the kitchen, smelling up the place, and making a mess!” But nothing could have been further from the truth. He just needed a little time and Worm Composting 101 to understand there was nothing to worry about.
The fact is, worms aren’t the exploring type. They’re exceptionally fond of the warm, moist confines of their bins. It’s where their food is, where they can get busy with other friendly worms, and where they run no risk of drying up. Not to mention, worms instinctively avoid the light. It would take some kind of crisis in the bin before you’d ever find your red wigglers trying to get out of the bin.
As for odors becoming an issue, that only happens when human error muddles things up. By nature, worms rapidly consume decomposing organic matter. But if we feed them naturally stinky things or something they can’t eat fast enough, you may catch a whiff. But when things are running smoothly, worm compost smells nice, like fresh earth.
Lastly, one of the beautiful things about raising worms is that they can live entirely contained. The food, worms, bedding, and compost all stay inside of a lidded container that doesn’t leak or spill when properly maintained.
The only time I’d say there’s real potential for mess is when you’re harvesting worms or compost. That’s really best done outside when the weather is more accommodating.
So, although the risk for smells, spills, and escape was slim to none, once the worms were inside, I laid out a little carpet square for my bin to sit on. That way, there would be nothing on the floor and it felt like my worms had a special space of their own.
Perfect Placement
My methods have changed a bit since then and now 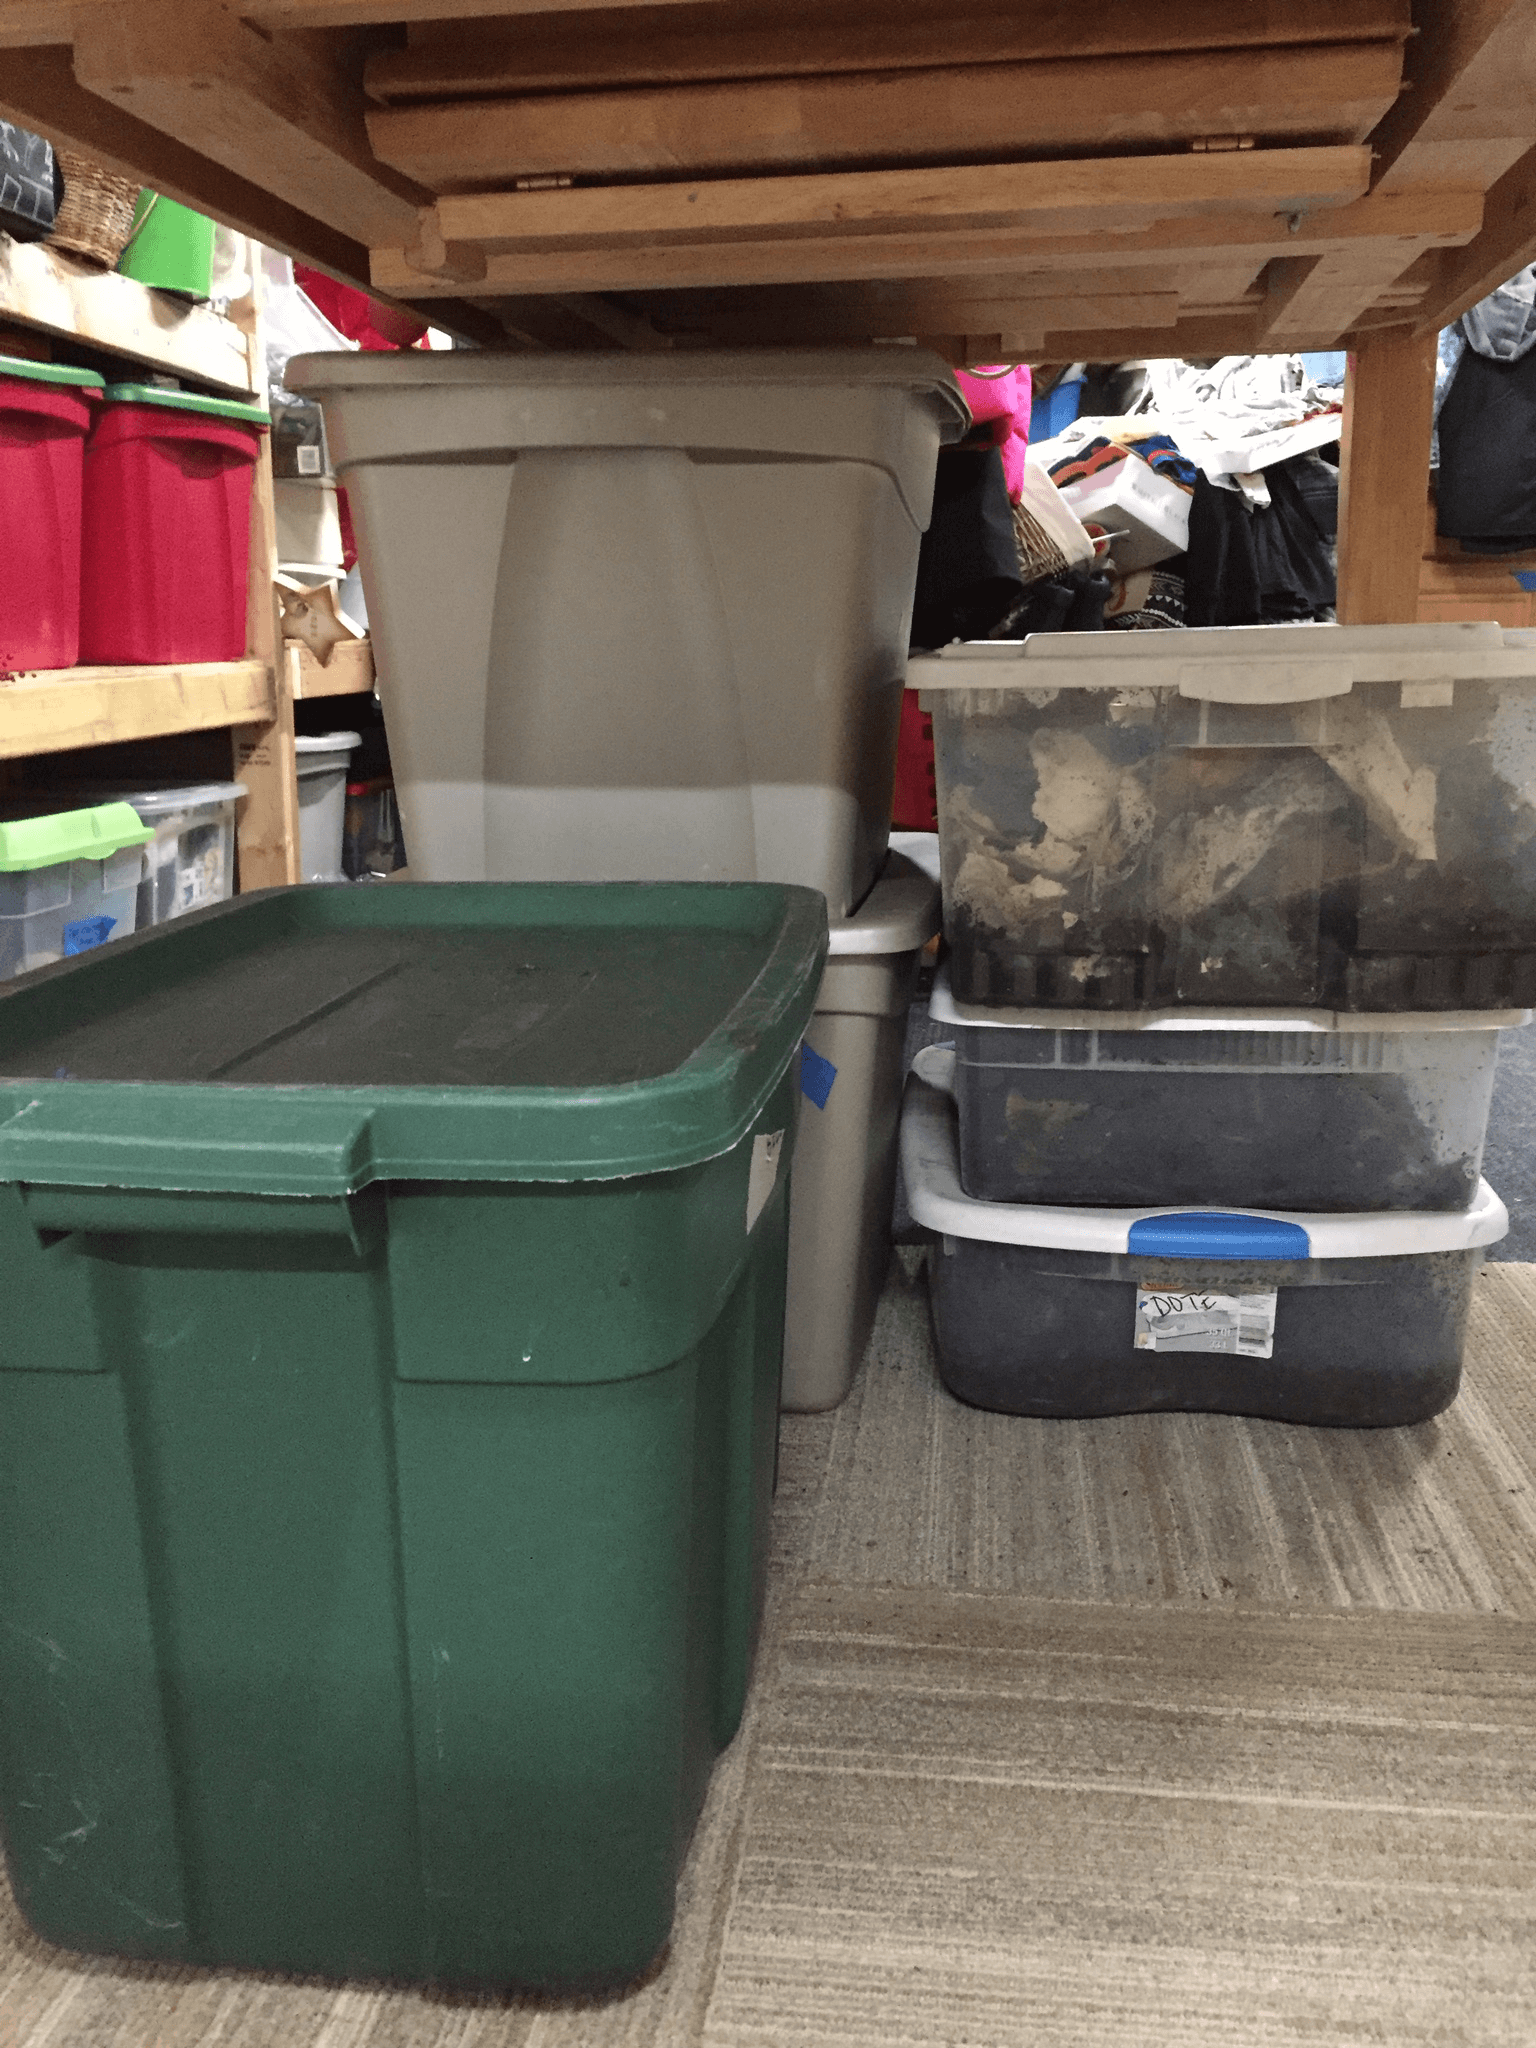 I’ve even got a colony of worms living in under-bed storage containers. My husband has entirely forgotten about those guys! Another stackable tray style bin sits right under my desk in the kitchen. And the rest hang out in totes down in the basement.
As you can see, indoor worm composting suits my family quite well. I hope you’ll find the same to be true for you. But before you take another step, remember that not just any place inside will do.
It takes well-regulated temperature, moisture, and pH to ensure a healthy worm composting environment. Of course, your home is set to keep YOU happy, not your worms. And where you may appreciate consistent heat blasting from your vents, if your worms have to take that, they’ll expire from being dried out or cooked!
And though a sunny window can be a beautiful place to sit and read, a black plastic bin sitting directly under one can soon become like a little oven. Some windows are also drafty in winter. I know I sometimes wake up with frost on the INSIDE of mine. Worms kept near that kind of cold will likely suffer.
So what’s best?
It really doesn’t take much. Keep them in the dark and in a place where the temperature remains consistently between 55F and 77F.
Indoor Maintenance
All that’s left is to continue with appropriate feedings and keep your worms’ bedding moist and well aerated. You may consider investing in even a simple compost probe moisture meter to help you know if you need to air things out or add a bit more moisture to your bin.
Another thing to remember is how much waste will go into that bin this winter. Expect it to get really heavy. That’s one reason I prefer to keep the Worm Factory 360 in my kitchen rather than a storage bin.
That stacked style composter lets me work with just a single tray of compost at a time. Not only does that keep things easy, but it also keeps it physically manageable, which saves my back. The vented layers also allow for aeration, drainage, and sifting of the finished compost to lower trays. Not to mention, it’s got a much smaller footprint and greater capacity than those big tubs.
And don’t forget those holiday travel plans. How will your worms fare while you are away? No need to think twice, we’ve got you covered. Check out our Vacation Planning Guide for keeping worms safe while you plan to be away a while.
Brave the Cold- Near the Equator
Getting away to thaw for a week sounds especially nice, but what if you’re a fortunate soul who lives where the coldest it gets is maybe refrigerator temperature. Oh, boo hoo. (JK, we love you too.) And though it would be great of you to share your home with worms, you might be able to get away with keeping them outside instead.
It’s totally doable if you can put just a few precautions in place. This article will set you up for being successful where outdoor worm composting is safe year round.
In Conclusion
‘Tis the season to be jolly, and to be green, but not like the Jolly Green Giant! Keep your footprint small and don’t let winter slow you down. Bring in your bins or start your composting hobby off right there in your kitchen. And if you need some starter worms to give as gifts, we can hand deliver them just in time for holiday meal scraps!
If you just can’t wait to learn more, sign up now for The Squirm Firm Newsletter. Your FREE subscription means you’ll be one of the first to access each new edition of tips, tricks, and expert advice sent exclusively to our members. That’s right, just once each month you’ll find something new and exciting to discover about worm composting your way to greener living.
‘Til next month, keep cozy and keep composting!
Hi!
My husband is dead set against my worms being indoors. Wintering in the garage is very difficult and I’ve lost a herd that way. How can I make the garage a better environment?
Betty- I love your determination! Whether it be the garage, shed, basement, or carport, a few things can help worms survive. First, is temperature regulation. Keep your worm bin off the ground with the help of a few bricks or wood blocks. The ground may freeze but with space beneath your bin you can insulate and even add a heating element. Even something as simple as a seed starting mat can be enough in a mild climate. Also, the more bedding inside your bin, the more well insulated they’ll be from the start. Second, keep moisture up around 80% and third, make sure they have some fresh air regularly flowing through. Best of luck!
Thank you for an entertaining, informative and well-thought out article! Cheers!
My worms live indoors year around. They are very gracious guests. They are quiet with no loud parties and if you didn’t know what their bins look like you wouldn’t know there were worms in the house. NO odors or escapees and occasionally I even dust the lid. I give the castings to gardening friends and they love it. It is a win/win.
I am new. Like your site. Soon we will be going to Mexico and yes I will be taking 200.rw.
Thanks for the info. I live in Australia, just west of Sydney and I too have had to bring my worms indoors as it will be 43 degrees celsius today. 40 degrees yesterday. From experience last year I know that my worms will cook in their black container in the heat. I do put ice cubes under a towel and that also helps with the heat.
Thanks for sharing Jacqueline. Tell us more about the ice cubes under a towel. I know some folks freeze also water bottles and bury them to keep things cool.
Unfortunately, I did not have the option of bringing my compost pile indoors for the winter. So, with great trepidation, I hoped for the best. Oh my, RWs are amazing little beasts. Despite a hard winter with a month of temperatures between 8 and 30 degrees F, the worms seem to be thriving. Nice fat adult wigglers, some juveniles, and plenty of cocoons.
They are in 200 gallons of shredded maple leaves, and get coffee, cardboard, and fruit when it’s not snowing. It seems like there is enough decomposition to keep the bedding at a survivable (but waaaay less than ideal) temperature.
Weirdly, there are still live worms in a trashcan filled with harvested compost, even though there is very little for them to eat and the soil temperature is only slightly above freezing. The survivors found during weekly “rescue missions” are curled up in tight balls.
Here’s hoping I can come up with a better system next winter. Do you have any thoughts on using seed warming mats or soil heating cable for outdoor compost worms?
Thank you for all your helpful articles. I really enjoy reading them!
Hi Robin! Thanks for sharing your method of outdoor worm composting! What is key here, and great for all of us, is to consider using the largest available space to work the magic in. With so much area for decomposition and retention of heat, moisture, etc- your worms have a lot of area to seek safety when somewhere else is less than ideal.
Francesca, thank you so much for your reply! Bah, after the frigid winter weather lingered on and on and on — which dropped the temperature in the warmest part of the compost bin down below 50 degrees — I bought a 12′ soil warming cable to keep everyone from freezing to death. It seems to have done the trick.
I removed the top 10 inches of worms and compost, arranged the cable in a spiral, and then put the top layer back. The soil temperature increased 4-5 degrees per day for a couple of days, which only boosted it into the high-50s or low-60s. Not ideal, but it was enough to kick start the composting process again. After a week, the temperatures were between the mid-60s and mid-80s, depending on how far from the center I tested, despite air temperatures between 2 and 17 degrees. So, disaster averted.
The downside is that it is impossible to properly aerate the bin because the cable is very thin. Using a pitchfork or bedding fork would run the risk of inadvertently breaking the cable. I fluff the top few inches with my hand, but the bottom two feet are quite compacted. There are also a couple of slimy, stinky areas that the worms have abandoned.
I suppose some stinky slime is better than thousands of dead worms. Maybe it would work better if the cable was buried a lot farther down. Like, when building next fall’s pile, it might be a better solution to start with 6″ of shredded leaves, put the warming cable on the leaf layer, and then add a couple more feet of leaves and cardboard. Then maybe the cable would be far enough down that the pile could be aerated without the risk of breaking the cable. I dunno, but I guess I’ll try it after harvesting the bin this fall.
I would LOVE to read a post about outdoor winter options!
Hi Robin! I love hearing about your methods. Thank you so much for telling us all about it. Will you harvest it all in spring and remove the cable then? How do surface dwelling red wigglers enjoy being under feet of leaves and cardboard? Do they end up being throughout the pile? How big is your fall pile when it starts? How much does it shrink by spring? I’ll bet having warming cables will really do a lot to keep it active and get it processed pretty quickly!
Hi Francesca! I haven’t harvested any of the bin yet, but I did remove the soil warming cable now that the temperatures are above freezing again. The cable is pretty thin (slightly smaller than an iPod or phone recharging cable), so one needs to be careful. But it was not hard to follow the orange-colored cable from the plug, and just carefully dig around it until the whole length was pulled out of the bin.
The pile was 2.5′ feet high and 3′ across in November, and is only 6″ inches shorter now. Virtually all of it is shredded maple leaves, so the bedding was already in teensie pieces. Oh, and a couple of big pumpkins, lots of cardboard boxes, and food scraps also would have replenished material that got gobbled up.
I forked down through most of the bed, and found worms even at the bottom. Their dispersal seems to depend more on preference, than depth. So, irrespective of how deep or shallow, there are lots of worms in the areas with crumpled up paper bags, squares of burlap, cantaloupe rinds, coffee, mangoes, or slimy banana peels. But the worms are ambivalent about areas with shredded paper that has not broken down yet, pomegranate peels, kiwis, the greens from carrots and radishes, or dried plants from the flower beds. Even though they don’t make burrows, the worms seem to be able to dig down through deep layers of material to reach tasty morsels.
Actually, the little brutes now have all flocked to the half of the bin topped with 15 gallons of fresh mule poop. Weirdly, it doesn’t stink at all, and it isn’t heating up either. (The bin only has “road apples” without any urine-soaked bedding that would be high in nitrogen and salts.) The worms seem to like the “road apples” to the exclusion of everything else at the moment.
Lol, filling a car with lidless buckets heaped with fresh dung certainly encourages one to drive veeeeeery carefully. 😀
What juicy worm composting talk. I love it! And your pile sounds delicious! Clearly, your worms are finding everything they want and have plenty of variety to boot. So my next question, with a pile that big, do you ever actually harvest out the compost from the worms, or just let the population self regulate as you pull from the heap. You use the compost, right?
Hi Francesca! Oh goodness, I am scratching my noggin on how to harvest with the current set-up, which I’ve only used since late last Fall. The last pile was a 2′ x 3′ x 18″ pile on the ground that was not hard to harvest, using a set of stacking soil classification pans used by gold panners. The top pan catches the uneaten bedding, food, twigs, and some of the bigger worms, with material less than 1/4″ falling through to the pan beneath. The middle pan catches most of the little worms, but material less an 1/8″ falls through to the bottom pan. If one wants very finely sifted compost and to catch all the cocoons and baby worms, the bottom pan with a 1/12″ mesh will do the trick. The process was a bit time-consuming, but faster than trying to harvest 20 gallons of compost by making little piles, waiting for the worms to wiggle down, scraping off the top little bit, and repeating over and over.
The Geobin is way too large to try shoving everything to one side; adding bedding and food to the other side; and and letting the herd mosey over to their new Wormtopia. I can undo and open an entire side, and try grabbing finished compost from the bottom. But I’m a little worried that a tidal wave of compost will come spilling out. Lol, guess I will find out in a couple weeks when it comes time to harvest Spring compost.
Thank you for all your great tips on maintaining a “hypnotic lair for lust & debauchery.” I think of that article every time I give the herd a particularly decadent treat. Oh lala, MANGO and MELON!
I think a drum style compost sifter may be in your future!